Showing posts with label prayer flags. Show all posts

Saturday, March 7, 2015

Prayer Flags send our wishes, intentions, and joy to the world.


Traditionally, prayer flags are used to promote peace, compassion, strength, and wisdom. The flags do not carry prayers to gods, which is a common misconception; rather, the Tibetans believe the prayers and mantras will be blown by the wind to spread the good will and compassion into all pervading space. Therefore, prayer flags are thought to bring benefit to all. ~http://en.wikipedia.org/wiki/Prayer_flag
I recently participated in a prayer flag swap and received so many lovely flags. Too pretty, I kept thinking, to ever hang outside and let the wind and rain take them slowly out into the world. And yet, why must I keep them inside, pretty and inspiring to look at, but gathering dust. I want hold on to these flags, yet the spirit of them is with me no matter what I do with them. And do I really need more stuff?

Of course I created flags to send back with words of love and creation. It was a very restful and fun swap, I fell into quiet introspection as I worked on these flags. Enjoy this series of flags and note the unifying little green beads that scattered their way across the flags. I used cottons, silks, vintage fabrics and anything else I could in the process.


Create

Freedom

Renew v2


Perseverance

Renew v1

Silence


Jump

Wednesday, June 18, 2014

Fabric Art Journal...a different medium

art journal, fabric, fabric art journal, fabric journal
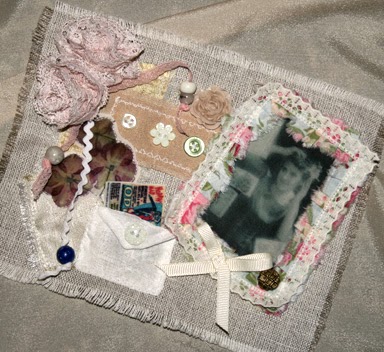
Fabric Art Journal pages are pages with a definite fabric origin. Starting with a fabric base, you can stitch, glue, embroider, decorate in any imaginable medium. Just like a paper page. I have seen prayer flag type pages, quilts, beaded creations, embroidery, added paper, ephemera, charms, natural objects, buttons and more.
It changes the creation process. Rather than starting with a doodle, a word, a stain and adding outlines, colored pencils, markers, paint and ephemera, I need more time to gather fabrics, plan, stitch, actually design the page. The final product changes and grows as the page develops, but it is not as fluid and spontaneous. On the other hand, I can rip out stitches and change easier than ink on paper.
Process decisions are more complicated, how to add words, machine stitch, hand written on fabric, embroidered? How do I attach something that has no loops like sticks and feathers? Will glue hold or ruin the piece?
But the result is amazing. A piece with a tactile presence that paper doesn't have. Give it a try.
  • Start with a favorite piece of fabric or muslin. Don't forget old favorite shirts or dresses for backings.
  • Gather buttons, ribbon, beads, ephemeral, lace, embellishments from old clothes, old jewelry, fabric scraps.
  • Layout items, rearrange, add, subtract. When you are happy with the arrangement. Take a picture.
  • Now remove the top layers. Hand or machine stitch the back objects. 
  • Using the photo, add another layer and stitch or glue the items. Add another layer. By this stage, you are probably hand stitching. Tuck in ribbons, feathers, add beads to dangling items.
  • Stand back. Add something else. Think about it, add more.
  • Don't forget pockets (stitch 3 sides of a patch or scrap, leave the fourth open) to tuck in tickets or memorabilia. Buttons off those old clothes add depth. Pressed flowers can be secured under netting or a piece from an old sheer curtain. 
  • Write a word with Sharpie on a scrap of fabric and secure. Or stitch a phrase with embroidery floss. 
And then again. Use the same techniques with paper. What have you got to lose? Let yourself go.

Tuesday, April 22, 2014

Round Robin Journaling

What a fun idea. Start a page, pass it to the left. Take the page passed to you and add some fun. Then pass it on.
We may try this in a future class. Try it with a friend, try it with yourself. We all have an alter ego.

Check out this blog.

http://balzerdesigns.typepad.com/balzer_designs/2014/01/art-journal-every-day-art-journal-round-robin.html?utm_source=feedblitz&utm_medium=FeedBlitzRss&utm_campaign=handmadeart

Friday, April 11, 2014

Week someting! Must pick up that journal again. Spring has arrived.

The weeks go by so fast when you are busy. Lots of crafting and lots of singing, seldom at the same time though. My journaling is more sketching ideas for dolls, cute monsters,  fabric journal pages, prayer flags and decorated puzzle pieces. Fun items, but hardly the satisfaction I get from finishing a page.

I have more paper bag drop cloth backgrounds and I want to get out my gel plate again for more mono prints. I love having papers ready to cut up and add to any project.

Next week is our final class and I am thinking of Spring! Warmer air, blustery winds, soft rain, early spring flowers, crocus, snow drops and daffodil spikes pushing up. The grass is even beginning to green. And have you noticed the blush of red in the trees. You see it start to cover the hills and woods with a light red haze.

Sketch that first flower you see. Use the colors of purple, yellow and white, the dominant colors of early spring flowers. Draw the words that enter your heart when you breath warm fresh air. Enjoy.

Saturday, March 1, 2014

Week Four and Five - Lettering and Style Journals

Lettering

Last week's class was small but fun. We explored using lettering in our journals as a design or focus point in an art page. Write big, trace over your letters. Use magazine letters to spell out your message. Print using wide letters, stretch out your cursive. Mix upper case and lowercase. Mix thick and thin. Practice different styles until you have developed your own style. Have fun!

Style Journal

Teag, a fellow Craftser member created a journaling techniques journal, a place to keep ideas so she remembers them and can refer to them when inspiration hits. Her pages are art in their own right and she has lots of great ideas to share. Take some time to scroll around the site as there are even more ideas to get your going in earlier and later messages on this Craftster message board. 

Art Journaling Techniques by Teag 1  (scroll down the page to find teag's post)

Art Journaling Techniques by Teag 2  (scroll down the page to find teag's post)

I have mentioned Craftster.org before and I encourage you to visit. It is an amazing place to wander around in and if you want to join in, membership is free.

Thursday, February 13, 2014

Week Three - Have a song in your heart?

Or your head. I always have fragments of songs running through my mind. The direct result of choir, women's singing circle, radio, TV and even that constant music overhead when shopping.

Those fragments of songs make excellent starts for a journal page. Hand letter the words, decorate around them with drawings or collage, add some color over the top. Or write out all the lyrics (if you know them, if not, try Google) across the page and paint or collage over them, leaving your favorite bit free.

Tips for lettering:

  1. Cut out words and letters from magazines to spell out your message.
  2. Write lightly and big in pencil. Draw an outline around the letters with pen and color in.
  3. Start with a highlighter. Write or draw your letters, outline and add embellishments.
  4. Write big with a pen then go back and make some strokes darker and thicker.
  5. Print out your words and tear or cut them out to paste down. Break them up in to individual words and place down one side of your page or flow across the page.
So as you listen to that song in your heart, pick up a pen and put it to the paper. Visit the gallery for some examples of lettering. Or visit these links for more ideas.

Jennibellie: turorials on making books, lettering and recycling into crafts: http://www.youtube.com/user/jennibellie?feature=watch

Easy lettering techniques: http://www.youtube.com/watch?v=th_2HvOnoO4


More lettering techniques: http://www.clothpaperscissors.com/blogs/clothpaperscissorstoday/archive/2012/06/25/how-to-make-art-journal-lettering-look-like-art.aspx


More: http://www.clothpaperscissors.com/blogs/clothpaperscissorstoday/archive/2014/01/17/handmade-cards-an-easy-creating-lettering-technique.aspx

Monday, February 3, 2014

Week Two - In Love with UpCyling

I recycle all I can and probably could do more. But my favorite is turning trash into art. Making those cardboard cereal boxes into books. Transforming magazines into pages of our lives. You get the idea. Check out this link for other ideas.
http://www.clothpaperscissors.com/blogs/clothpaperscissorstoday/archive/2014/02/03/5-upcycling-ideas-for-your-trash-amp-stash.aspx

Journaling through the snow

 We are looking at lot of snow time this week. Snow always seems special to me, snow transforms a gray/brown landscape into something astounding. And there is always that feeling of specialness....breaking the routine. Brew a cup of hot chocolate with little marshmallows and try some visualizing exercises.
  • Take time to look at the patterns trees and snow make. Can you mimic this in some way in your journal with strips of paper or streaks of paint or pencil?
  • Look at the shadows, what color are they? Look at the neutrals in the trees and ground. Use a monochromatic (shades and tones of one basic color) palette in a page.
  • Use an old artist trick and look at the landscape through a small empty picture frame or a camera viewfinder. Frame your world. Look at the balance of light and dark. Use the shapes of light and dark in your page.
  • How does a snow fall make you feel. Like a special day? Closed in?
  • Focus in on something small. A bird print in the snow, a twig poking up. And have you noticed the buds on the trees starting to swell? They know spring is coming.
  • And oh yes, use some of your stash to add to the fun. Corrugated cardboard makes a great forest background. 

And check out the gallery!